A look under the hood at Powershell Remoting through a cross plaform lens by Matt Wrock

Many Powershell enthusiasts don't realize that when they are using commands like New-PsSession and streaming pipelines to a powershell runspace on a remote machine, they are actually writing a binary message wrapped in a SOAP envelope that leverages a protocol with the namesake of Windows Vista. Not much over a year ago I certainly wasn't. This set of knowledge all began with needing to transfer files from a linux machine to a windows machine. In a pure linux world there is a well known tool for this called SCP. In Windows we map drives or stream bytes to a remote powershell session. How do we get a file (or command for that matter) from one of these platforms to the other?

I was about to take a plunge to go deeper than I really wanted into a pool where I did not really care to swim. And today I emerge with a cross platform "partial" implementation of Powershell Remoting in Ruby. No not just WinRM but a working PSRP client.

In this post I will cover how PSRP differs from its more familiar cross platform cousin WinRM, why its of value and how one can give it a try. Hopefully this will provide an interesting perspective into what Powershell Remoting looks like from an implementor's point of view.

In the beginning there was WinRM

While PSRP is a different protocol from WinRM (Windows Remote Management) with its own spec. It cannot exist or be explained without WinRM. WinRM is a SOAP based web service defined by a protocol called Web Services Management Protocol Extensions for Windows Vista (WSMV). I love that name. This protocol defines several different message types for performing different tasks and gathering different kinds of information on a remote instance. I'm going to focus here on the messages involved with invoking commands and collecting their output.

A typical WinRM based conversation for invoking commands goes something like this:

  1. Send a Create Shell message and get the shell id from the response
  2. Create a command in the shell sending the command and any arguments and grab the command id from the response
  3. Send a request for output on the command id which may return streams (stdout and/or stderr) containing base64 encoded text.
  4. Keep requesting output until the command state is done and examine the exit code.
  5. Send a command termination signal
  6. Send a delete shell message

The native windows tool (which nobody uses anymore) to speak pure winrm is winrs.exe.

C:\dev\winrm [winrm-v2]> winrs -r:http://192.168.137.10:5985 -u:vagrant -p:vagrant ipconfig

Windows IP Configuration

Ethernet adapter Ethernet:

   Connection-specific DNS Suffix  . : mshome.net
   Link-local IPv6 Address . . . . . : fe80::c11b:f734:5bd4:ab03%3
   IPv4 Address. . . . . . . . . . . : 192.168.137.10
   Subnet Mask . . . . . . . . . . . : 255.255.255.0
   Default Gateway . . . . . . . . . : 192.168.137.1

You can turn on analytical event log messages or watch a wireshark transcript of the communication. One thing is for sure, you will see a lot of XML and alot of namespace definitions. Its not fun to debug but you'll learn to appreciate it after examining PSRP transcripts.

Here's an example create command message:

<s:Envelope
 xmlns:s="http://www.w3.org/2003/05/soap-envelope"
 xmlns:wsa="http://schemas.xmlsoap.org/ws/2004/08/addressing"
 xmlns:wsman="http://schemas.dmtf.org/wbem/wsman/1/wsman.xsd">
 <s:Header>
 <wsa:To>
 http://localhost:80/wsman
 </wsa:To>
 <wsman:ResourceURI s:mustUnderstand="true">
 http://schemas.microsoft.com/wbem/wsman/1/windows/shell/cmd
 </wsman:ResourceURI>
 <wsa:ReplyTo>
 <wsa:Address s:mustUnderstand="true">
 http://schemas.xmlsoap.org/ws/2004/08/addressing/role/anonymous
 </wsa:Address>
 </wsa:ReplyTo>
 <wsa:Action s:mustUnderstand="true">
 http://schemas.microsoft.com/wbem/wsman/1/windows/shell/Command
 </wsa:Action>
 <wsman:MaxEnvelopeSize s:mustUnderstand="true">153600</wsman:MaxEnvelopeSize>
 <wsa:MessageID>
 uuid:F8671978-E928-49DA-ADB8-5BF97EDD9535</wsa:MessageID>
 <wsman:Locale xml:lang="en-US" s:mustUnderstand="false" />
 <wsman:SelectorSet>
 <wsman:Selector Name="ShellId">
 uuid:0A442A7F-4627-43AE-8751-900B509F0A1F
 </wsman:Selector>
 </wsman:SelectorSet>
 <wsman:OptionSet xmlns:xsi="http://www.w3.org/2001/XMLSchema-instance">
 <wsman:Option Name="WINRS_CONSOLEMODE_STDIN">TRUE</wsman:Option>
 <wsman:Option Name="WINRS_SKIP_CMD_SHELL">FALSE</wsman:Option>
 </wsman:OptionSet>
 <wsman:OperationTimeout>PT60.000S</wsman:OperationTimeout>
 </s:Header>
 <s:Body>
 <rsp:CommandLine
 xmlns:rsp="http://schemas.microsoft.com/wbem/wsman/1/windows/shell">
 <rsp:Command>del</rsp:Command>
 <rsp:Arguments>/p</rsp:Arguments>
 <rsp:Arguments>
 d:\temp\out.txt
 </rsp:Arguments>
 </rsp:CommandLine>
 </s:Body>
</s:Envelope>

Oh yeah. Thats good stuff. This runs del /p d:\temp\out.txt.

Powershell over WinRM

When you invoke a command over WinRM, you are running inside of a cmd.exe style shell. Just as you would inside a local cmd.exe, you can always run powershell.exe and pass it commands. Why would anyone ever do this? Usually its because they are using a cross platform WinRM library and its just the only way to do it.

There are popular libraries written for ruby, python, java, Go and others. Some of these abstract the extra powershell.exe call and make it feel like a true native powershell repl experience. The fact is that this works quite well and so why bothering implementing a separate protocol? As I'll cover in a bit, PSRP is much more complicated than vanila WSMV so if you can get away with the simpler protocol, great.

The limitations of WinRM

There are a few key limitations with WinRM. Many of these limitations are the same limitations involved with cmd.exe:

Multiple shells

You have to open two shells (processes). First the command shell and then startup a powershell instance. This can be a performance suck especially if you need to run several commands.

Maximum command length

The command line length is limited to 8k inside cmd.exe. Now you may ask, why in the world would you want to issue a command greater than 8192 characters? There are a couple common use cases here:

  1. You may have a long script (not just a single command) you want to run. However, this script is typically fed to the -command or -EncodedCommand argument of powershell.exe so this entire script needs to stay within the 8k threshold. Why not just run the script as a file? Ha!...Glad you asked.
  2. WinRM has no native means of copying files like SCP. So the common method of copying files via WinRM is to base64 encode a file's contents and create a command that appends 8k chunks to a file.

#2 is what sparked my interest in all of this. I just wanted to copy a damn file, So Shawn Neal, Fletcher Nichol and I wrote a ruby gem that leveraged WinRM to do just that. It basically does this alot:

"a whole bunch of base64 text" >> c:\some\file.txt

It turns out that 8k is not a whole lot of data and if you want to copy hundreds of megabytes or more, grab a book. We added some algorithms to make this as fast as possible like compressing multiple files before transferring and extracting them on the other end. However, you just cant get around the 8k transfer size and no performance trick is gonna make that fast.

More Powershell streams than command streams

Powershell supports much more than just stdout and stderr. Its got progress, verbose, etc, etc. The WSMV protocol has no rules for transmitting these other streams. So this means all streams other than the output stream is sent on stderr.

This can confuse some WinRM libraries and cause commands that are indeed successful to "appear" to fail. The trick is to "silence" these streams. For example the ruby WinRM gem prepends all powershell scripts with:

$ProgressPreference = "SilentlyContinue"

Talking with Windows Nano

The ruby WinRM gem uses the -EncodedCommand to send powershell command text to powershell.exe. This is a convenient way of avoiding quote hell and base64ing text that will be transferred inside XML markup. Well Nano's powershell.exe has no EncodedCommand argument and so the current ruby WinRM v1 gem cannot talk powershell with Windows Nano Server. Well that simply can't be. We have to be able to talk to Nano.

Introducing PSRP

So without further ado let me introduce PSRP. PSRP supports many message types for extracting all sorts of metadata about runspaces and commands. A full implementation of PSRP could create a rich REPL experience on non windows platforms. However in this post I'm gonna limit the discussion to messages involved in running commands and receiving their output.

As I mentioned before, PSRP cannot exist without WinRM. I did not just mean that in a philosophical sense, it literally sits on top of the WSMV protocol. Its sort of a protocol inside a protocol. Running commands and receiving their response includes the same exchange illustrated above and issuing the same WSMV messages. The key differences is that instead of issuing commands in these messages in plain text and recieving simple base64 encoded raw text output, the powershell commands are packaged as a binary PSRP message (or sequence of message fragments) and the response includes one or more binary fragments that are then "defragmented" into a single binary message.

PSRP Message Fragment

A complete WSMV SOAP envelope can only be so big. This size limitation is specified on the server via the MaxEnvelopeSizeKB setting. This defaults to 512 on 2012R2 and Nano server. So a very large pipeline script or a very large pipeline output must be split into fragments.

The PSRP spec illustrates a fragment as:

All fragments have an object id representing the message being fragmented and each fragment of that object will have incrementing fragment ids starting at 0. E and S are each a single bit flag that indicates if the fragment is an End fragment and if it is a Start fragment. So if an entire message fits into one fragment, both E and S will be 1.

The blob (the interesting stuff) is the actual PSRP message and of course the blob length of the blob in bytes. So the idea here is that you chain the blobs ob all fragments with the same object id in the order of fragment id and that aggregated blob is the PSRP message.

Here is an implementation of a message fragment written in ruby and here is how we unwrap several fragments into a message.

PSRP messages

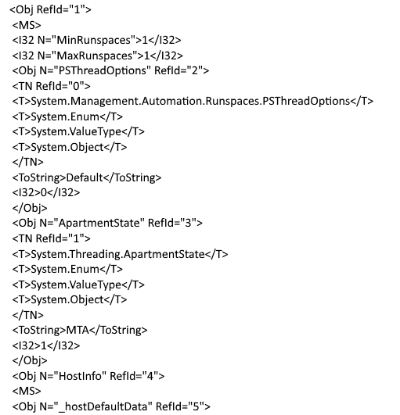
There are 41 different types of PSRP messages. Here is the basic structure as illustrated in the PSRP spec:

Destination signifies who the message is for: client or server. Message type is a integer representing which of the 41 possible message types this is and RPID and PID both represent runspace_id and pipeline_id respectively. The data has the "meat" of the message and its structure is determined by the message type. The data is XML. Many powershellers are familiar with CLIXML. Thats the basic format of the message data. So in the case of a create_pipeline message, this will include the CLIXML representation of the powershell cmdlets and arguments to run. It can be quite verbose but always beautiful. The symmetric nature of XML really shines here.

Here is an implementation of PSRP message in ruby.

A "partial" implementation in Ruby

So as far as I am aware, the WinRM ruby gem has the first open source implementation of PSRP. Its not officially released yet, but the source is fully available and works (at least integration tests are passing). Why am I labeling it a "partial" implementation?

As I mentioned earlier, PSRP provides many message structures for listing runspaces, commands and gathering lots of metadata. The interests of the WinRM gem are simple and aims to adhere to the same basic interface it uses to issue WSMV messges (however we have rewritten the classes and methods for v2). Essentially we want to provide an SSH like experience where a user issues a command string and gets back string based standard output and error streams as well as an exit code. This really is a "dumbed down" rendering of what PSRP is capable of providing.

The possibilities are very exciting and perhaps we will add more true powershell REPL features in the future but today when one issues a powershell script, we are basically constructing CLIXML that emits the following command:

Invoke-Expression -Command "your command here" | Out-String -Stream

This means we do not have to write a CLIXML serializer/deserializer but we reap most of the benefits of running commands directly in powershell. No more multi shell lag, no more comand length limitations and hello Nano Server. In fact, our repo provides a Vagrantfile that provisions Windows Nano server for running integration tests.

Give it a try!

I have complete confidence that there are major flaws in the implementation as it is now. I've been testing all along the way but I'm just about to start really putting it through the ringer. I can guarantee that Write-Host "Hello World!" works flawlessly. The Hello juxtaposed starkly against the double pointed 'W' and ending in the minimalistic line on top of a dot (!) is pretty amazing. The readme in the winrm-v2 branch has been updated to document the code as it stands now and assuming you have git, ruby and bundler installed, here is a quick rundown of how to run some powershell using the new PSRP implementation:

git clone https://github.com/WinRb/WinRM
git fetch
git checkout winrm-v2
bundle install
bundle exec irb

require 'winrm'
opts = { 
  endpoint: "http://myhost:5985/wsman",
  user: 'administrator',
  password: 'Pass@word1'
}
conn = WinRM::Connection.new(opts)
conn.shell(:powershell) do |shell|
  shell.run('$PSVersionTable') do |stdout, stderr|
    STDOUT.print stdout
    STDERR.print stderr
  end
end

The interfaces are not entirely finalized so things may still change. The next steps are to refactor the winrm-fs and winrm-elevated gems to use this new winrm gem and also make sure that it works with vagrant and test-kitchen. I cant wait to start collecting benchmark data comparing file copy speeds using this new version and the one in use today!

Certificate (password-less) based authentication in WinRM by Matt Wrock

This week the WinRM ruby gem version 1.8.0 released adding support for certificate authentication. Many thanks to the contributions of @jfhutchi and @fgimenezm that make this possible. As I set out to test this feature, I explored how certificate authentication works in winrm using native windows tools like powershell remoting. My primary takeaway was that it was not at all straightforward to setup. If you have worked with similar authentication setups on linux using SSH commands, be prepared for more friction. Most of this is simply due to the lack of documentation and google results (well now there is one more). Regardless, I still think that once setup, authentication via certificates is a very good thing and many are not aware that this is available in WinRM.

This post will walk through how to configure certificate authentication, enumerate some of the "gotchas" and pitfalls one may encounter along the way and then explain how to use certificate authentication using Powershell Remoting as well as via the WinRM ruby gem which opens up the possibility of authenticating from a linux client to a Windows WinRM endpoint.

Why should I care about certificate based authentication?

First lets examine why certificate authentication has value. What's wrong with usernames and passwords? In short, certificates are more secure. I'm not going to go too deep here but here are a few points to consider:

  • Passwords can be obtained via brute force. You can protect against this by having longer, more complex passwords and changing them frequently. Very few actually do that, and even if you do, a complex password is way easier to break than a certificate. Its nearly impossible to brute force a private key of sufficient strength.

  • Sensitive data is not being transferred over the wire. You are sending a public key and if that falls into the wrong hands, no harm done.

  • There is a stronger trail of trust establishing that the person who is seeking authentication is in fact who they say they are given the multi layered process of having a generated certificate signed by a trusted certificate authority.

Its still important to remember that nothing may be able to protect us from sophisticated aliens or time traveling humans from the future. No means of security is impenetrable.

Not as convenient as SSH keys

So one reason some like to use certificates over passwords in SSH scenarios is ease of use. There is a one time setup "cost" of sending your public key to the remote server, but:

  1. SSH provides command line tools that make this fairly straight forward to setup from your local environment.

  2. Once setup, you just need to initiate an ssh session to the remote server and you don't have to hassle with entering a password.

Now the underlying cryptographic and authentication technology is no different using winrm, but both the initial setup and the "day to day" use of using the certificate to login is more burdensome. The details of why will become apparent throughout this post.

One important thing to consider though is that while winrm certificate authentication may be more burdensome, I don't think the primary use case is for user interactive login sessions (although that's too bad). In the case of automated services that need to interact with remote machines, these "burdens" simply need to be part of the connection automation and its just a non sentient cpu that does the suffering. Lets just hope they won't hold a grudge once sentience is obtained.

High level certificate authentication configuration overview

Here is a run down of what is involved to get everything setup for certificate authentication:

  1. Configure SSL connectivity to winrm on the endpoint

  2. Generate a user certificate used for authentication

  3. Enable Certificate authentication on the endpoint. Its disabled by default for server auth and enabled on the client side.

  4. Add the user certificate and its issuing CA certificate to the certificate store of the endpoint

  5. Create a user mapping in winrm with the thumbprint of the issuing certificate on the endpoint.

I'll walk through each of these steps here. When the above five steps are complete, you should be able to connect via certificate authentication using powershell remoting or using the ruby or python open source winrm libraries.

Setting up the SSL winrm listener

If you are using certificate authentication, you must use a https winrm endpoint. Attempts to authenicate with a certificate using http endpoints will fail. You can setup SSL on the endpoint with:

$ip="192.168.137.169" # your ip might be different
$c = New-SelfSignedCertificate -DnsName $ip `
                               -CertStoreLocation cert:\LocalMachine\My
winrm create winrm/config/Listener?Address=*+Transport=HTTPS "@{Hostname=`"$ip`";CertificateThumbprint=`"$($c.ThumbPrint)`"}"
netsh advfirewall firewall add rule name="WinRM-HTTPS" dir=in localport=5986 protocol=TCP action=allow

Generating a client certificate

Client certificates have two key requirements:

  1. An Extended Key Usage of Client Authentication

  2. A Subject Alternative Name with the UPN of the user.

Only ADCS certificates work from Windows 10/2012 R2 clients via powershell remoting

This was the step that I ended up spending the most time on. I continued to receive errors saying my certificate was malformed:

new-PSSession : The WinRM client cannot process the request. If you are using a machine certificate, it must contain a DNS name in the Subject Alternative Name extension or in the Subject Name field, and no UPN name. If you are using a user certificate, the Subject Alternative Name extension must contain a UPN name and must not contain a DNS name. Change the certificate structure and try the request again.

I was trying to authenticate from a windows 10 client using powershell remoting. I don't typically work or test in a domain environment and don't run an Active Directory Certificate Services authority. So I wanted to generate a certificate using either New-SelfSignedCertificate or OpenSSL.

In short here is the bump I hit: powershell remoting from a windows 10 or windows 2012 R2 client failed to authenticate with certificates generated from OpenSSL or New-SelfSignedCertificate. However these same certificates succeed to authenticate from windows 7 or windows 2008 R2. They only worked on Windows 10 and 2012 R2 if I used the ruby WinRM gem instead of powershell remoting. Note that while I tested on windows 10 and 2012 R2, I'm sure that windows 8.1 suffers the same issue. The only certificates I got to work on windows 10 and 2012 R2 via powershell remoting were created via an Active Directory Certificate Services Enterprise CA .

So unless I can find out otherwise, it seems that you must have access to an Enterprise root CA in Active Directory Certificate Services and have client certificates issued in order to use certificate authentication from powershell remoting on these later windows versions. If you are using ADCS, the stock client template should work.

Generating client certificates via OpenSSl

As stated above, certificates generated using OpenSSL or New-SelfSignedCertificate did not work using powershell remoting from windows 10 or 2012 R2. However, if you are using a previous version of windows or if you are using another client (like the ruby or python libraries), then these other non-ADCS methods will work fine and do not require the creation of a domain controller and certificate authority servers.

If you do not already have OpenSSL tools installed, you can get them via chocolatey:

cinst openssl.light -y

Then you can run the following powershell to generate a correctly formatted user certificate which was adapted from this bash script:

function New-ClientCertificate {
  param([String]$username, [String]$basePath = ((Resolve-Parh .).Path))

  $OPENSSL_CONF=[System.IO.Path]::GetTempFileName()

  Set-Content -Path $OPENSSL_CONF -Value @"
  distinguished_name = req_distinguished_name
  [req_distinguished_name]
  [v3_req_client]
  extendedKeyUsage = clientAuth
  subjectAltName = otherName:1.3.6.1.4.1.311.20.2.3;UTF8:$username@localhost
"@

  $user_path = Join-Path $basePath user.pem
  $key_path = Join-Path $basePath key.pem
  $pfx_path = Join-Path $basePath user.pfx

  openssl req -x509 -nodes -days 3650 -newkey rsa:2048 -out $user_path -outform PEM -keyout $key_path -subj "/CN=$username" -extensions v3_req_client 2>&1

  openssl pkcs12 -export -in $user_path -inkey $key_path -out $pfx_path -passout pass: 2>&1

  del $OPENSSL_CONF
}

This will output a certificate and private key file both in base64 .pem format and additionally a .pfx formatted file.

Generating client certificates via New-SelfSignedCertificate

If you are on windows 10 or server 2016, then you should have a more advanced version of the New-SelfSignedCertificate cmdlet - more advaced than what shipped with windows 2012 R2 and 8.1. Here is the command to generate the script:

New-SelfSignedCertificate -Type Custom `
                          -Container test* -Subject "CN=vagrant" `
                          -TextExtension @("2.5.29.37={text}1.3.6.1.5.5.7.3.2","2.5.29.17={text}upn=vagrant@localhost") `
                          -KeyUsage DigitalSignature,KeyEncipherment `
                          -KeyAlgorithm RSA `
                          -KeyLength 2048

This will add a  certificate for a vagrant user to the personal LocalComputer folder in the certificate store.

Enable certificate authentication

This is perhaps the simplest step. By default, certificate authentication is enabled for clients and disabled for server. So you will need to enable it on the endpoint:

Set-Item -Path WSMan:\localhost\Service\Auth\Certificate -Value $true

Import the certificate to the appropriate certificate store locations

If you are using powershell remoting, the user certificate and its private key should be in the My directory of either the LocalMachine or the CurrentUser store on the client. If you are using a cross platform library like the ruby or python library, the cert does not need to be in the store at all on the client. However, regardless of client implementation, it must be added to the server certificate store.

Importing on the client

As stated above, this is necessary for powershell remoting clients. If you used ADCS or New-SelfSignedCertificate, then the generated certificate is added automatically. However if you used OpenSSL, you need to import the .pfx yourself:

Import-pfxCertificate -FilePath user.pfx `
                      -CertStoreLocation Cert:\LocalMachine\my

Importing on the server

There are two steps to timporting the certificate on the endpoint:

  1. The issuing certificate must be present in the Trusted Root Certification Authorities of the LocalMachine store

  2. The client certificate public key must be present in the Trusted People folder of the LocalMachine store

Depending on your setup, the issuing certificate may already be in the Trusted Root location. This is the certificate used to issue the client cert. If you are using your own enterprise certificate authority or a publicly valid CA cert, its likely you already have this in the trusted roots. If you used OpenSSL or New-SelfSignedCertificate then the user certificate was issued by itself and needs to be imported.

If you used OpenSSL, you already have the .pem public key. Otherwise you can export it:

Get-ChildItem cert:\LocalMachine\my\7C8DCBD5427AFEE6560F4AF524E325915F51172C |
  Export-Certificate -FilePath myexport.cer -Type Cert

This assumes that 7C8DCBD5427AFEE6560F4AF524E325915F51172C is the thumbprint of your issuing certificate. I guarantee that is an incorrect assumption.

Now import these on the endpoint:

Import-Certificate -FilePath .\myexport.cer `
                   -CertStoreLocation cert:\LocalMachine\root
Import-Certificate -FilePath .\myexport.cer `
                   -CertStoreLocation cert:\LocalMachine\TrustedPeople

Create the winrm user mapping

This will declare on the endpoint: given a issuing CA, which certificates to allow access. You can potentially add multiple entries for different users or use a wildcard. We'll just map our one user:

New-Item -Path WSMan:\localhost\ClientCertificate `
         -Subject 'vagrant@localhost' `
         -URI * `
         -Issuer 7C8DCBD5427AFEE6560F4AF524E325915F51172C `
         -Credential (Get-Credential) `
         -Force

Again this assumes the issuing certificate thumbprint of the certificate that issued our user certificate is 7C8DCBD5427AFEE6560F4AF524E325915F51172C and we are allowing access to a local account called vagrant. Note that if your user certificate is self-signed, you would use the thumbprint of the user certificate itself.

Using certificate authentication

This completes the setup. Now we should actually be able to login remotely to the endpoint. I'll demonstrate this first using powershell remoting and then ruby.

Powershell remoting

C:\dev\WinRM [master]>Enter-PSSession -ComputerName 192.168.137.79 `
>> -CertificateThumbprint 7C8DCBD5427AFEE6560F4AF524E325915F51172C
[192.168.137.79]: PS C:\Users\vagrant\Documents>

Ruby WinRM gem

C:\dev\WinRM [master +3 ~0 -0 !]> gem install winrm
WARNING:  You don't have c:\users\matt\appdata\local\chefdk\gem\ruby\2.1.0\bin in your PATH,
          gem executables will not run.
Successfully installed winrm-1.8.0
Parsing documentation for winrm-1.8.0
Done installing documentation for winrm after 0 seconds
1 gem installed
C:\dev\WinRM [master +3 ~0 -0 !]> irb
irb(main):001:0> require 'winrm'
=> true
irb(main):002:0> endpoint = 'https://192.168.137.169:5986/wsman'
=> "https://192.168.137.169:5986/wsman"
irb(main):003:0> puts WinRM::WinRMWebService.new(
irb(main):004:1*   endpoint,
irb(main):005:1*   :ssl,
irb(main):006:1*   :client_cert => 'user.pem',
irb(main):007:1*   :client_key => 'key.pem',
irb(main):008:1*   :no_ssl_peer_verification => true
irb(main):009:1> ).create_executor.run_cmd('ipconfig').stdout

Windows IP Configuration


Ethernet adapter Ethernet:

   Connection-specific DNS Suffix  . : mshome.net
   Link-local IPv6 Address . . . . . : fe80::6c3f:586a:bdc0:5b4c%12
   IPv4 Address. . . . . . . . . . . : 192.168.137.169
   Subnet Mask . . . . . . . . . . . : 255.255.255.0
   Default Gateway . . . . . . . . . : 192.168.137.1

Tunnel adapter Local Area Connection* 12:

   Connection-specific DNS Suffix  . :
   IPv6 Address. . . . . . . . . . . : 2001:0:5ef5:79fd:24bc:3d4c:3f57:7656
   Link-local IPv6 Address . . . . . : fe80::24bc:3d4c:3f57:7656%14
   Default Gateway . . . . . . . . . : ::

Tunnel adapter isatap.mshome.net:

   Media State . . . . . . . . . . . : Media disconnected
   Connection-specific DNS Suffix  . : mshome.net
=> nil
irb(main):010:0>

Interested?

This functionality just became available in the winrm gem 1.8.0 this week. This gem is used by Vagrant, Chef and Test-Kitchen to connect to remote machines. However, none of these applications provide configuration options to make use of certificate authentication via winrm. My personal observation has been that nearly no one uses certificate authentication with winrm but that may be a false observation or a result of the fact that few no about this possibility.

If you are interested in using this in Chef, Vagrant or Test-Kitchen, please file an issue against their respective github repositories and make sure to @ mention me (@mwrock) and I'll see what I can do to plug this in or you can submit a PR yourself if so inclined.

Installing and running a Chef client on Windows Nano Server by Matt Wrock

I've been really excited about Nano Server ever since it was first talked about last year. It's a major shift in how we "do windows" and has the promise of addressing many pain points that exist today for those who run Windows Server farms at scale. As a Chef enthusiast and employee I am thrilled to be apart of the Journey to making Chef on Nano a delight. Now note the word "journey" here. We are on the road to awesome  but we've just laid down the foundation and scaffolding. Heck, even Nano itself is still evolving as I write this and is on it's own journey to RTM. So while today I would not characterize the experience of Chef on Nano as "delightful," I can say that it is "possible." For those who enjoy living on the bleeding edge, "possible" is a significant milestone on the way to "delight."

In this post I will share what Nano is, how to get it and run it on your laptop, install a chef client and run a basic recipe. I'll also point out some unfinished walls and let you know some of the rooms that are entirely missing. Also bear in mind that I have not toured the entire house so you will certainly find other gaps between here and delight and hopefully you will share. Keep in mind that I am a software developer and not a product owner at Chef. So I won't be talking about road maps or showing any gnat charts here. I'm really speaking more as a enthusiast here and as someone who can't wait to use it more and make the experience of running Chef on Nano awesome like a possum because possums are awesome. (They really are. We have one living under our front porch and its just so gosh darn cute!)

What is Nano and why should I care?

Some of you may be thinking, "finally a command line text editor for windows!" Yeah that would be great but no I'm not talking about the GNU Nano text editor familiar to many linux users, I am talking about Windows Nano Server. You have likely heard of Windows Server Core. Well this takes core to the next level (or two). While Server Core does not support GUI apps (except the ones it does) but still supports all applications and APIs available on GUI based Windows Server, Nano throws backwards compatibility to the wind and slashes vast swaths of what sits inside a Windows server today widdling it down to a few hundred megabytes.

There is no 32 bit subsystem only 64 bit is supported. While traditional Windows server has multiple APIs for doing the same thing, Nano pairs much of that down throwing out many APIs where you can accomplish the same tasks using another API. Nope, no VBScript engine here. All those windows roles and features that lie dormant on a traditional Windows server simply don't exist on Nano. You start in a bare core and then add what you need.

Naturally this is not all roses and sunshine. The road to Nano will have moments of pain and frustration. We have grown accustomed to our bloated Windows and will need to adjust our workflows and in some case our application architecture to exist in this new environment. Here is one gotcha many may hit pretty quickly. Maybe you pull down the Couchbase MSI and try to run MSIEXEC on that thing. Well guess what...on Nano "The term 'msiexec' is not recognized as the name of a cmdlet, function, script file, or operable program." Nano will introduce new ways to install applications.

But before we get all cranky about the loss of MSIs (yeah the "packaging" system that wasn't really) lets think about what this smaller surface area gets us. First an initial image file that is often less than 300MB compared to what would be 4GB on 2012R2. With less junk in the trunk, there is less to update, so no more initial multi hour install of hundreds of updates. Fewer updates will mean fewer reboots. All of this is good stuff. Nano also boots up super duper quick. The first time you provision a Nano server, you may think you have done something wrong - I did - because it all happens so much more quickly than what you are used to.

Info graphic provided by Microsoft

Info graphic provided by Microsoft

Sounds great! How do I go to there?

There are several ways to get a nano server up and running and I'll outline several options here:

  • Download the latest Windows Server 2016 Technical Preview and follow these instructions to extract and install a Nano image.
  • Download just a VHD and import that into Hyper-V (user: administrator/pass: Pass@word1). While it successfully installs on VirtualBox, you will not be able to successfully to remote to the box. 
  • Are you a Vagrant user? Feel free to "vagrant up" my mwrock/WindowsNano Nano eval box (user: vagrant/pass: vagrant). It has a Hyper-V and VirtualBox provider. The Hyper-V provider may "blue screen" on first boot but should operate fine after rebooting a couple times.
  • Don't want to use some random dude's box but want to make your own with Packer? Check out my post where I walk through how to do that.

Depending on wheather you are a Vagrant user or VirtualBox user or not, options 2 and 3 are by far the easiest and should get you up and running in minutes. The longest part is just downloading the image but even that is MUCH faster than a standard windows ISO. About 6 minutes compared to 45 minutes on my FIOS home connection.

Preparing your environment

Basically we just need to make sure we can remote to the nano server and also copy files to it.

Setup a Host-Only network on VirtualBox

You will need to be able to access the box with a non localhost IP in order to transfer files over SMB. This only applies if you are using a NAT VirtualBox network (the default). Hyper-V Switches should require no additional configuration.

First create a Host-Only network if your VirtualBox host does not already have one:

VBoxManage hostonlyif create

Now add a NIC on your Nano guest that connects over the Host-Only network:

VBoxManage modifyvm "VM name" --nic2 hostonly

Now log on to the box to discover its IP address. Immediately after login, you should see its two IPs. One starts with 10. and the other starts with 172. You will want to use the 172 address.

Make sure you can remote to the Nano box

We'll establish a remote powershell connection to the box. If you can't do this now, we won't get far with Chef. So run the following:

$ip = "<ip address of Nano Server>"
Set-Item WSMan:\localhost\Client\TrustedHosts $ip
Enter-PSSession -ComputerName $ip -Credential $ip\Administrator

This should result in dropping you into an interactive remote powershell session on the nano box:

[172.28.128.3]: PS C:\Users\vagrant\Documents>

Open File and Print sharing Firewall Rule

If you are using my vagrant box or packer templates, this should already be setup. Otherwise, you will need to open the File and Print sharing rule so we can mount a drive to the Nano box. Don't you worry, we won't be doing any printing.

PS C:\dev\nano> Enter-PSSession -ComputerName 172.28.128.3 -Credential vagrant
[172.28.128.3]: PS C:\Users\vagrant\Documents> netsh advfirewall firewall set rule group="File and Printer Sharing" new enable=yes

Updated 16 rule(s).
Ok.

Mount a network drive from the host to the Nano server

We'll just create a drive that connects to the root of the C: drive on the Nano box:

PS C:\dev\nano> net use z: \\172.28.128.3\c$
Enter the user name for '172.28.128.3': vagrant
Enter the password for 172.28.128.3:
The command completed successfully.

PS C:\dev\nano> dir z:\


    Directory: z:\


Mode                LastWriteTime         Length Name
----                -------------         ------ ----
d-----       11/21/2015   2:47 AM                Program Files
d-----       11/21/2015   2:47 AM                Program Files (x86)
d-----       11/21/2015   2:47 AM                ProgramData
d-----       11/21/2015   2:47 AM                Users
d-----       11/21/2015  10:50 AM                Windows

Ok. If you have gotten this far, you are ready to install Chef.

Installing Chef

Remember earlier in this post when I mentioned that there is no msiexec on Nano? We can't just download the MSI on Nano and install it like we normally would. There are some pre steps we will need to follow and we also need to make sure to use just the right Chef version.

Downloading the right version of Chef

If you remember, not only does Nano lack the ability to install MSIs, it also lacks a 32 bit subsystem. Lucky for us, Chef now ships a 64 bit Windows Chef client. On downloads.chef.io, the last few versions of the chef client provide a 64bit Windows install. However, don't get the latest one. The last couple versions have a specially compiled version of ruby that is not compatible with Nano server. This will be remedied in time, but for now, download the 64 bit install of Chef 12.7.2.

PS C:\dev\nano> Invoke-WebRequest https://packages.chef.io/stable/windows/2008r2/chef-client-12.7.2-1-x64.msi -OutFile Chef-Client.msi

Extract the Chef client files from the MSI

There are a couple ways to do this. The most straight forward is to simply install the MSI locally on your host. That will install the 64 bit Chef client, and in the process, extract its files locally.

Another option is to use a tool like LessMSI which can extract the contents without actually running the installer. This can be beneficial because it won't run installation code that adjusts your registry, changes environment variables or changes any other state on your local host that you would rather leave in tact.

You can grab lessmsi from chocolatey:

choco install lessmsi

Now extract the Chef MSI contents:

lessmsi x .\chef-client.msi c:\chef-client\

This extracts the contents of the MSI to c:\chef-client. What we are interested in now is the extracted C:\chef-client\SourceDir\opscode\chef.zip. That has the actual files we will copy to the Nano server. Lets expand that zip:

Expand-Archive -Path C:\chef-client\SourceDir\opscode\chef.zip -DestinationPath c:\chef-client\chef

Note I am on Windows 10. The Expand-Archive command is only available in powershell version 5. However if you are on a previous version of powershell, I am confident you can expand the zip using other methods.

Once this zip file is extracted by whatever means, you should now have a full Chef install layout at c:\chef-client\chef.

Editing win32-process gem before copying to Nano

Here's another area on "undelight." The latest version of the win32-process gem introduced coverage of some native kernel API functions that were not ported to Nano. So attempts to attach to these C functions results in an error when the gem is loaded. Since win32-process is a dependency of the chef client, loading the chef client will blow up.

Not to worry, we can perform some evasive maneuvers to work around this. Its gonna get dirty here, but I promise no one is looking. There are basically four lines in the win32-process source that we simply need to remove:

PS C:\dev\nano> (Get-content -Path C:\chef-client\chef\embedded\lib\ruby\gems\2.0.0\gems\win32-process-0.8.3\lib\win32\proces
s\functions.rb) | % { if(!$_.Contains(":Heap32")) { $_ }} | Set-Content C:\chef-client\chef\embedded\lib\ruby\gems\2.0.0\gems
\win32-process-0.8.3\lib\win32\process\functions.rb

Copy the Chef files to the Nano server

Now we are ready to copy over all the chef files to the Nano Server:

 Copy-Item C:\chef-client\chef\ z:\chef -Recurse

Validate the chef install

Lets set the path to include the chef ruby and bin files and then call chef-client -v:

PS C:\dev\nano> Enter-PSSession -ComputerName 172.28.128.3 -Credential vagrant
[172.28.128.3]: PS C:\Users\vagrant\Documents> $env:path += ";c:\chef\bin;c:\chef\embedded\bin"
[172.28.128.3]: PS C:\Users\vagrant\Documents> chef-client -v
Chef: 12.7.2

Hopefully you see similar output including the version of the chef-client.

Converging on Nano

Now we are actually ready to "do stuff" with Chef on Nano. Lets start simple. We will run chef-apply on a trivial recipe:

file "c:/blah.txt" do
  content 'blah'
end

Lets copy the recipe and converge:

[172.28.128.3]: PS C:\Users\vagrant\Documents> chef-apply c:/chef/blah.rb
[2016-03-20T07:49:38+00:00] WARN: unable to detect ipaddress
[2016-03-20T07:49:45+00:00] INFO: Run List is []
[2016-03-20T07:49:45+00:00] INFO: Run List expands to []
[2016-03-20T07:49:45+00:00] INFO: Processing file[c:/blah.txt] action create ((chef-apply cookbook)::(chef-apply recipe) line
 1)
[2016-03-20T07:49:45+00:00] INFO: file[c:/blah.txt] created file c:/blah.txt
[2016-03-20T07:49:45+00:00] INFO: file[c:/blah.txt] updated file contents c:/blah.txt
[172.28.128.3]: PS C:\Users\vagrant\Documents> cat C:\blah.txt
blah

That worked! Our file is created and we can see it has the intended content.

Bootstrapping a Nano node on a Chef server

Maybe you want to join a fleet of nano servers to a chef server. Well at the moment knife bootstrap windows throws encoding errors. This could be related to the fact that the codepage used by a Nano shell is UTF-8 unlike the "MS-DOS"(437) codepage used on all previous versions of windows.

Lets just manually bootstrap for now:

knife node create -d nano
# We use ascii encoding to avoid a UTF-8 BOM
knife client create -d nano | Out-File -FilePath z:\chef\nano.pem -Encoding ascii
knife acl add client nano nodes nano update

Note that the knife acl command requires the knife-acl gem that is not shipped with chef-dk but you can simply chef gem install it.

Now lets create a basic client.rb file in z:\chef\client.rb:

log_level        :info
log_location     STDOUT
chef_server_url  'https://api.opscode.com/organizations/ment'
client_key 'c:/chef/nano.pem'
node_name  'nano'

Now lets converge against our server:

[172.28.128.3]: PS C:\Users\vagrant\Documents> chef-client
[2016-03-20T18:28:07+00:00] INFO: *** Chef 12.7.2 ***
[2016-03-20T18:28:07+00:00] INFO: Chef-client pid: 488
[2016-03-20T18:28:08+00:00] WARN: unable to detect ipaddress
[2016-03-20T18:28:15+00:00] INFO: Run List is []
[2016-03-20T18:28:15+00:00] INFO: Run List expands to []
[2016-03-20T18:28:15+00:00] INFO: Starting Chef Run for nano
[2016-03-20T18:28:15+00:00] INFO: Running start handlers
[2016-03-20T18:28:15+00:00] INFO: Start handlers complete.
[2016-03-20T18:28:16+00:00] INFO: Loading cookbooks []
[2016-03-20T18:28:16+00:00] WARN: Node nano has an empty run list.
[2016-03-20T18:28:16+00:00] INFO: Chef Run complete in 1.671495 seconds
[2016-03-20T18:28:16+00:00] INFO: Running report handlers
[2016-03-20T18:28:16+00:00] INFO: Report handlers complete
[2016-03-20T18:28:16+00:00] INFO: Sending resource update report (run-id: 1fb8ae2a-8455-4b94-b956-99c5a34863ea)
[172.28.128.3]: PS C:\Users\vagrant\Documents>

We can use chef-client -r recipe[windows] if you have the windows cookbook on your server to converge its default recipe.

What else is missing?

The other gaping hole here is Test-Kitchen cannot converge a Nano test instance. Two main reasons prevent this:

  1. There is no provisioner that can get around the MSI install issue
  2. Powershell calls from the winrm gem will fail because Nano's Powershell.exe does not accept the -EncodedCommand argument.

One might think that the first issue could probably be worked around by creating a custom provisioner to extract the chef files on the host and copy them to the instance. However, because winrm-fs, used by Test-Kitchen to copy files to a windows test instance, makes ample use of the -EncodedCommand argument. Shawn Neal and I are currently working on a v2 of the winrm gem that will use a more modern protocol for powershell calls to get around the -EncodedCommand limitation and provide many other benefits as well.

Try it out!

Regardless of the missing pieces, as you can see, one can at least play with Chef and Nano today and get a glimpse of what life might be like in the future. Its no flying car but it beats our multi gigabyte Windows images of today.

Run Kitchen tests in Travis and Appveyor by Matt Wrock

There are a few cookbook repositories I help to maintain and services like Travis and Appveyor provide a great enhancement to the pull request workflow both for contributors and maintainers. As a contributor I get fast feedback without bothering any human on whether my PR meets a minimum bar of quality and complies with the basic code style standards of the maintainers. As a maintainer, I can more easily triage incoming contributions and simply not waste time reviewing failed commits.

Its common to use travis and appveyor for unit tests and even longer running functional tests as long as they take a reasonable amount of time to run. However, in the Chef cookbook world, you usually do not see them include Test-Kitchen tests which are the cookbook equivalent of end to end functional or integration tests. I have found myself wishing for an easy way to kick off cloud based Test-Kitchen runs triggered by pull request pushes. Often there just is no way to know for sure if a commit breaks a cookbook or if it "works" unless I manually pull down the PR and invoke the kitchen test (usually via vagrant). This takes time and I wish I could just see a green check mark or red 'X' automatically without doing anything.

This week while reviewing PRs for the Chocolatey cookbook, I set out to run the kitchen tests in appveyor and did not see any readily available way to do so until Stuart Preston steered me to the proxy driver included with test-kitchen.

In this post I'll talk about some other patterns folks have used to run kitchen tests in travis, why I went with the proxy driver,  and how to go about using it in your cookbook repository.

Using Docker

One approach is to install and start docker inside the travis VM and then use kitchen-docker or kitchen-dokken to run them in the travis run. This is a very viable approach. You can fire up a docker container very quickly and most cookbooks will run fine containerized. There are a few downsides:

  • Installing and configuring docker while fairly straight forward may require several lines of setup script.
  • Some cookbooks may not run well in containers.
  • Not a viable approach for windows based cookbooks. Looking forward to when they are.

Leveraging AWS or other cloud alternatives

Another popular approach is to run the kitchen tests from travis but reach out to another cloud provider to host the actual test instances. This also has its drawbacks:

  • Unless using the aws free tier, its not free and if you are, its not fast.
  • You have to stash keys in your travis.yml

I have an ephemeral machine, why cant I use it?

Both of the above solutions don't sit well for me because it just seems sub optimal to have to bring up another "instance" whether it be container or cloud based when travis or appveyor just did that for me. The beauty of these services is that they bring up an isolated and full fledged test VM so why do I need to bring up another one?

Most kitchen drivers are built to go "somewhere else"

This usually makes perfect sense. I don't want to run kitchen tests and have the test instance BE my machine because the state of that machine will be changed and I want to remain isolated from those changes and easily undo them. However in travis or appveyor, I AM somewhere else.

Yet having looked, I found no kitchen driver that would converge and test locally. The closest thing was kitchen-ssh which simply communicates with a test instance over SSH and does not try to spin up a vm. Surely one can easily just SSH to localhost. However, its just SSH and does not also leverage WinRM when talking to windows.

Enter the built in proxy driver

I wanted a driver that could run commands using whatever kitchen transport was configured (SSH or WinRM) but would not try to interact with a hypervisor or cloud to start a separate instance. If I just point the transport to localhost, that should succeed in running locally. Of course a "local" transport that would run native shell commands locally and use the native filesystem for file operations would be one step better. However, pointing SSH and WinRM to localhost seems to work just fine and requires no additional work.

Using the proxy driver

The chocolatey-cookbook repository includes a "real world" example that uses appveyor. I'll also briefly walk through both appveyor and travis samples here.

The .kitchen.yml or .kitchen.{travis or appveyor}.yml file

First we'll look at the .kitchen.yml file that may be the same for either travis or appveyor. Most actual cookbook repositories will likely use .kitchen.travis.yml or .kitchen.appveyor.yml since they will want to use .kitchen.yml for locally run tests.

---
driver:
  name: proxy
  host: localhost
  reset_command: "exit 0"
  port: <%= ENV["machine_port"] %>
  username: <%= ENV["machine_user"] %>
  password: <%= ENV["machine_pass"] %>

provisioner:
  name: chef_zero

platforms:
  - name: ubuntu-14.04
  - name: windows-2012R2

verifier:
  name: inspec

suites:
  - name: default
    run_list:
      - recipe[machine_test]

The driver section uses the proxy driver and configures a host, port username and password for the transport. The host setting is required and we will use "localhost". It also uses a reset_command which can be used for running a command on the instance during the "create" phase but we don't need it to do anything on a fresh appveyor or travis instance. The reset_command is required so we just specify "exit 0" which should work cross platform to do nothing.

The transport being used is determined by the same kitchen logic, either the transport is explicitly declared in the YAML or kitchen will default to SSH unless the platform name starts with "win." This example configures the credential and port from environment variables. That will be more clear when we look at the .travis.yml and appveyor.yml files.

.travis.yml

language: ruby

env:
  global:
    - machine_user=travis
    - machine_pass=travis
    - machine_port=22
    - KITCHEN_YAML=.kitchen.travis.yml

rvm:
  - 2.1.7

sudo: required
dist: trusty

before_install:
  - sudo usermod -p "`openssl passwd -1 'travis'`" travis

script:
  - bundle exec rake
  - bundle exec kitchen verify ubuntu

branches:
  only:
  - master

Here we set the port, user name and password environment variables and we set the KITCHEN_YAML variable to our special travis targeted kitchen.yml. We also give the travis user (what travis runs under) a password. Our test "script" runs kitchen verify against the ubuntu platform.

appveyor.yml

version: "master-{build}"

os: Windows Server 2012 R2
platform:
  - x64

environment:
  machine_user: test_user
  machine_pass: Pass@word1
  machine_port: 5985
  KITCHEN_YAML: .kitchen.appveyor.yml
  SSL_CERT_FILE: c:\projects\kitchen-machine\certs.pem

  matrix:
    - ruby_version: "21"

clone_folder: c:\projects\kitchen-machine
clone_depth: 1
branches:
  only:
    - master

install:
  - ps: net user /add $env:machine_user $env:machine_pass
  - ps: net localgroup administrators $env:machine_user /add
  - ps: $env:PATH="C:\Ruby$env:ruby_version\bin;$env:PATH"
  - ps: gem install bundler --quiet --no-ri --no-rdoc
  - ps: Invoke-WebRequest -Uri http://curl.haxx.se/ca/cacert.pem -OutFile c:\projects\kitchen-machine\certs.pem

build_script:
  - bundle install || bundle install || bundle install

test_script:
  - bundle exec kitchen verify windows

This one is a bit more involved but still not too bad. Like we did in the travis.yml, we assign our port, username and password environment variables and also set the .kitchen.yml file override. Here we actually go ahead and create a new user and make it an administrator. This is because its tough to get at the appveyor user's password and there may be issues changing its password in the middle of an active session.

Another thing to note for windows is we need to do some special SSL cert setup. Ruby and openssl do not use the native windows certificate store to manage certificate authorities; so we go ahead and download them and point openssl at them with the SSL_CERT_FILE variable. Those who use the Chef-dk can be thankful that hides this detail from you, but there is no chef-dk in this environment.

Finally our test_script invokes all tests in the windows platform.

The Results

Now I can see a complete Test-Kitchen log of converged resources and verifier test results right in my travis and appveyor build output.

Here is the end of the travis log:

And here is appveyor:


Need an SSH client on Windows? Don't use Putty or CygWin...use Git by Matt Wrock

SSH in a native powershell window. I prefer to use console2 and enjoy judging others who don't (conemu is good too).

SSH in a native powershell window. I prefer to use console2 and enjoy judging others who don't (conemu is good too).

Every once in a while I hear of windows users trying to find a good SSH client for Windows to connect to their Linux boxes. For the longest time, a couple of the more popular choices have been Cygwin and Putty.

These still work today but I personally find the experience of both to be sub-optimal. There are lots of annoyances I find in each but the main thing they both lack is an integrated SSH experience in the shell console I use for everything else (mainly powershell) day in/day out. Cygwin and Putty run in separate console experiences. I just want to type 'ssh mwrock@blahblah' in my console of choice and have it work.

You already have the software

Ok, maybe not...but its very likely that if you are reading this and find yourself needing to SSH here and there, you also use GIT. Well many are unaware that git for windows bundles several Linux familiar tools. Many might use these in the git bash shell.

Friends don't let friends use the git bash shell on windows

Don't get me wrong here - I'm not anti bash when I am on Linux. Its great. But I find tools like bash and cygwin offer a "worst of both worlds" experience on Windows. You don't need to run in the bash window to access SSH. You just need to make a small modification to your path. Assuming git was installed to C:/Program Files/Git (the default location), just add C:/Program Files/Git/usr/bin to your path:

$new_path = "$env:PATH;C:/Program Files/Git/usr/bin"
$env:PATH=$new_path
[Environment]::SetEnvironmentVariable("path", $new_path, "Machine")

Bam! Now type 'ssh':

C:\dev\WinRM [psrp +1 ~1 -0 !]> ssh
usage: ssh [-1246AaCfgKkMNnqsTtVvXxYy] [-b bind_address] [-c cipher_spec]
       [-D [bind_address:]port] [-E log_file] [-e escape_char]
       [-F configfile] [-I pkcs11] [-i identity_file]
       [-L [bind_address:]port:host:hostport] [-l login_name] [-m mac_spec]
       [-O ctl_cmd] [-o option] [-p port]
       [-Q cipher | cipher-auth | mac | kex | key]
       [-R [bind_address:]port:host:hostport] [-S ctl_path] [-W host:port]
       [-w local_tun[:remote_tun]] [user@]hostname [command]
C:\dev\WinRM [psrp +1 ~1 -0 !]>

Don't have git?

Well that's a problem easily solved. Just grab chocolatey if you don't have it already and install git:

iex ((new-object net.webclient).DownloadString('https://chocolatey.org/install.ps1'))
choco install git -params "/GitAndUnixToolsOnPath"

Note that the "GitAndUnixToolsOnPath " param sets the environment variable for you. You will need to open a new shell for git and ssh to be available in your console and then you are ready to SSH to your heart's content!