
I've been really excited about Nano Server ever since it was first talked about last year. It's a major shift in how we "do windows" and has the promise of addressing many pain points that exist today for those who run Windows Server farms at scale. As a Chef enthusiast and employee I am thrilled to be apart of the Journey to making Chef on Nano a delight. Now note the word "journey" here. We are on the road to awesome but we've just laid down the foundation and scaffolding. Heck, even Nano itself is still evolving as I write this and is on it's own journey to RTM. So while today I would not characterize the experience of Chef on Nano as "delightful," I can say that it is "possible." For those who enjoy living on the bleeding edge, "possible" is a significant milestone on the way to "delight."
In this post I will share what Nano is, how to get it and run it on your laptop, install a chef client and run a basic recipe. I'll also point out some unfinished walls and let you know some of the rooms that are entirely missing. Also bear in mind that I have not toured the entire house so you will certainly find other gaps between here and delight and hopefully you will share. Keep in mind that I am a software developer and not a product owner at Chef. So I won't be talking about road maps or showing any gnat charts here. I'm really speaking more as a enthusiast here and as someone who can't wait to use it more and make the experience of running Chef on Nano awesome like a possum because possums are awesome. (They really are. We have one living under our front porch and its just so gosh darn cute!)
What is Nano and why should I care?
Some of you may be thinking, "finally a command line text editor for windows!" Yeah that would be great but no I'm not talking about the GNU Nano text editor familiar to many linux users, I am talking about Windows Nano Server. You have likely heard of Windows Server Core. Well this takes core to the next level (or two). While Server Core does not support GUI apps (except the ones it does) but still supports all applications and APIs available on GUI based Windows Server, Nano throws backwards compatibility to the wind and slashes vast swaths of what sits inside a Windows server today widdling it down to a few hundred megabytes.
There is no 32 bit subsystem only 64 bit is supported. While traditional Windows server has multiple APIs for doing the same thing, Nano pairs much of that down throwing out many APIs where you can accomplish the same tasks using another API. Nope, no VBScript engine here. All those windows roles and features that lie dormant on a traditional Windows server simply don't exist on Nano. You start in a bare core and then add what you need.
Naturally this is not all roses and sunshine. The road to Nano will have moments of pain and frustration. We have grown accustomed to our bloated Windows and will need to adjust our workflows and in some case our application architecture to exist in this new environment. Here is one gotcha many may hit pretty quickly. Maybe you pull down the Couchbase MSI and try to run MSIEXEC on that thing. Well guess what...on Nano "The term 'msiexec' is not recognized as the name of a cmdlet, function, script file, or operable program." Nano will introduce new ways to install applications.
But before we get all cranky about the loss of MSIs (yeah the "packaging" system that wasn't really) lets think about what this smaller surface area gets us. First an initial image file that is often less than 300MB compared to what would be 4GB on 2012R2. With less junk in the trunk, there is less to update, so no more initial multi hour install of hundreds of updates. Fewer updates will mean fewer reboots. All of this is good stuff. Nano also boots up super duper quick. The first time you provision a Nano server, you may think you have done something wrong - I did - because it all happens so much more quickly than what you are used to.
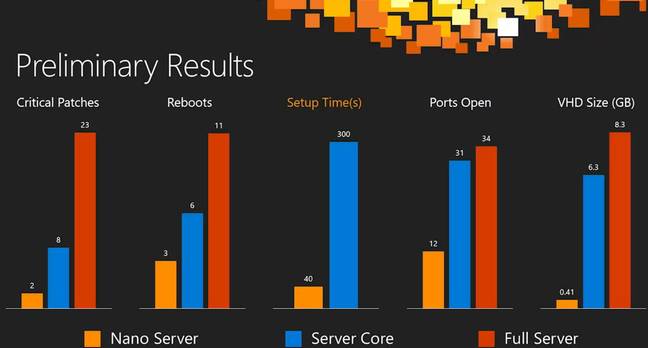
Info graphic provided by Microsoft
Sounds great! How do I go to there?
There are several ways to get a nano server up and running and I'll outline several options here:
- Download the latest Windows Server 2016 Technical Preview and follow these instructions to extract and install a Nano image.
- Download just a VHD and import that into Hyper-V (user: administrator/pass: Pass@word1). While it successfully installs on VirtualBox, you will not be able to successfully to remote to the box.
- Are you a Vagrant user? Feel free to "vagrant up" my mwrock/WindowsNano Nano eval box (user: vagrant/pass: vagrant). It has a Hyper-V and VirtualBox provider. The Hyper-V provider may "blue screen" on first boot but should operate fine after rebooting a couple times.
- Don't want to use some random dude's box but want to make your own with Packer? Check out my post where I walk through how to do that.
Depending on wheather you are a Vagrant user or VirtualBox user or not, options 2 and 3 are by far the easiest and should get you up and running in minutes. The longest part is just downloading the image but even that is MUCH faster than a standard windows ISO. About 6 minutes compared to 45 minutes on my FIOS home connection.
Preparing your environment
Basically we just need to make sure we can remote to the nano server and also copy files to it.
Setup a Host-Only network on VirtualBox
You will need to be able to access the box with a non localhost IP in order to transfer files over SMB. This only applies if you are using a NAT VirtualBox network (the default). Hyper-V Switches should require no additional configuration.
First create a Host-Only network if your VirtualBox host does not already have one:
VBoxManage hostonlyif create
Now add a NIC on your Nano guest that connects over the Host-Only network:
VBoxManage modifyvm "VM name" --nic2 hostonly
Now log on to the box to discover its IP address. Immediately after login, you should see its two IPs. One starts with 10. and the other starts with 172. You will want to use the 172 address.

Make sure you can remote to the Nano box
We'll establish a remote powershell connection to the box. If you can't do this now, we won't get far with Chef. So run the following:
$ip = "<ip address of Nano Server>"
Set-Item WSMan:\localhost\Client\TrustedHosts $ip
Enter-PSSession -ComputerName $ip -Credential $ip\Administrator
This should result in dropping you into an interactive remote powershell session on the nano box:
[172.28.128.3]: PS C:\Users\vagrant\Documents>
Open File and Print sharing Firewall Rule
If you are using my vagrant box or packer templates, this should already be setup. Otherwise, you will need to open the File and Print sharing rule so we can mount a drive to the Nano box. Don't you worry, we won't be doing any printing.
PS C:\dev\nano> Enter-PSSession -ComputerName 172.28.128.3 -Credential vagrant
[172.28.128.3]: PS C:\Users\vagrant\Documents> netsh advfirewall firewall set rule group="File and Printer Sharing" new enable=yes

Updated 16 rule(s).
Ok.
Mount a network drive from the host to the Nano server
We'll just create a drive that connects to the root of the C: drive on the Nano box:
PS C:\dev\nano> net use z: \\172.28.128.3\c$
Enter the user name for '172.28.128.3': vagrant
Enter the password for 172.28.128.3:
The command completed successfully.

PS C:\dev\nano> dir z:\


    Directory: z:\


Mode                LastWriteTime         Length Name
----                -------------         ------ ----
d-----       11/21/2015   2:47 AM                Program Files
d-----       11/21/2015   2:47 AM                Program Files (x86)
d-----       11/21/2015   2:47 AM                ProgramData
d-----       11/21/2015   2:47 AM                Users
d-----       11/21/2015  10:50 AM                Windows
Ok. If you have gotten this far, you are ready to install Chef.
Installing Chef
Remember earlier in this post when I mentioned that there is no msiexec on Nano? We can't just download the MSI on Nano and install it like we normally would. There are some pre steps we will need to follow and we also need to make sure to use just the right Chef version.
Downloading the right version of Chef
If you remember, not only does Nano lack the ability to install MSIs, it also lacks a 32 bit subsystem. Lucky for us, Chef now ships a 64 bit Windows Chef client. On downloads.chef.io, the last few versions of the chef client provide a 64bit Windows install. However, don't get the latest one. The last couple versions have a specially compiled version of ruby that is not compatible with Nano server. This will be remedied in time, but for now, download the 64 bit install of Chef 12.7.2.
PS C:\dev\nano> Invoke-WebRequest https://packages.chef.io/stable/windows/2008r2/chef-client-12.7.2-1-x64.msi -OutFile Chef-Client.msi
Extract the Chef client files from the MSI
There are a couple ways to do this. The most straight forward is to simply install the MSI locally on your host. That will install the 64 bit Chef client, and in the process, extract its files locally.
Another option is to use a tool like LessMSI which can extract the contents without actually running the installer. This can be beneficial because it won't run installation code that adjusts your registry, changes environment variables or changes any other state on your local host that you would rather leave in tact.
You can grab lessmsi from chocolatey:
choco install lessmsi
Now extract the Chef MSI contents:
lessmsi x .\chef-client.msi c:\chef-client\
This extracts the contents of the MSI to c:\chef-client. What we are interested in now is the extracted C:\chef-client\SourceDir\opscode\chef.zip. That has the actual files we will copy to the Nano server. Lets expand that zip:
Expand-Archive -Path C:\chef-client\SourceDir\opscode\chef.zip -DestinationPath c:\chef-client\chef
Note I am on Windows 10. The Expand-Archive command is only available in powershell version 5. However if you are on a previous version of powershell, I am confident you can expand the zip using other methods.
Once this zip file is extracted by whatever means, you should now have a full Chef install layout at c:\chef-client\chef.
Editing win32-process gem before copying to Nano
Here's another area on "undelight." The latest version of the win32-process gem introduced coverage of some native kernel API functions that were not ported to Nano. So attempts to attach to these C functions results in an error when the gem is loaded. Since win32-process is a dependency of the chef client, loading the chef client will blow up.
Not to worry, we can perform some evasive maneuvers to work around this. Its gonna get dirty here, but I promise no one is looking. There are basically four lines in the win32-process source that we simply need to remove:
PS C:\dev\nano> (Get-content -Path C:\chef-client\chef\embedded\lib\ruby\gems\2.0.0\gems\win32-process-0.8.3\lib\win32\proces
s\functions.rb) | % { if(!$_.Contains(":Heap32")) { $_ }} | Set-Content C:\chef-client\chef\embedded\lib\ruby\gems\2.0.0\gems
\win32-process-0.8.3\lib\win32\process\functions.rb
Copy the Chef files to the Nano server
Now we are ready to copy over all the chef files to the Nano Server:
Copy-Item C:\chef-client\chef\ z:\chef -Recurse
Validate the chef install
Lets set the path to include the chef ruby and bin files and then call chef-client -v:
PS C:\dev\nano> Enter-PSSession -ComputerName 172.28.128.3 -Credential vagrant
[172.28.128.3]: PS C:\Users\vagrant\Documents> $env:path += ";c:\chef\bin;c:\chef\embedded\bin"
[172.28.128.3]: PS C:\Users\vagrant\Documents> chef-client -v
Chef: 12.7.2
Hopefully you see similar output including the version of the chef-client.
Converging on Nano
Now we are actually ready to "do stuff" with Chef on Nano. Lets start simple. We will run chef-apply on a trivial recipe:
file "c:/blah.txt" do
  content 'blah'
end
Lets copy the recipe and converge:
[172.28.128.3]: PS C:\Users\vagrant\Documents> chef-apply c:/chef/blah.rb
[2016-03-20T07:49:38+00:00] WARN: unable to detect ipaddress
[2016-03-20T07:49:45+00:00] INFO: Run List is []
[2016-03-20T07:49:45+00:00] INFO: Run List expands to []
[2016-03-20T07:49:45+00:00] INFO: Processing file[c:/blah.txt] action create ((chef-apply cookbook)::(chef-apply recipe) line
 1)
[2016-03-20T07:49:45+00:00] INFO: file[c:/blah.txt] created file c:/blah.txt
[2016-03-20T07:49:45+00:00] INFO: file[c:/blah.txt] updated file contents c:/blah.txt
[172.28.128.3]: PS C:\Users\vagrant\Documents> cat C:\blah.txt
blah
That worked! Our file is created and we can see it has the intended content.
Bootstrapping a Nano node on a Chef server
Maybe you want to join a fleet of nano servers to a chef server. Well at the moment knife bootstrap windows throws encoding errors. This could be related to the fact that the codepage used by a Nano shell is UTF-8 unlike the "MS-DOS"(437) codepage used on all previous versions of windows.
Lets just manually bootstrap for now:
knife node create -d nano
# We use ascii encoding to avoid a UTF-8 BOM
knife client create -d nano | Out-File -FilePath z:\chef\nano.pem -Encoding ascii
knife acl add client nano nodes nano update
Note that the knife acl command requires the knife-acl gem that is not shipped with chef-dk but you can simply chef gem install it.
Now lets create a basic client.rb file in z:\chef\client.rb:
log_level        :info
log_location     STDOUT
chef_server_url  'https://api.opscode.com/organizations/ment'
client_key 'c:/chef/nano.pem'
node_name  'nano'
Now lets converge against our server:
[172.28.128.3]: PS C:\Users\vagrant\Documents> chef-client
[2016-03-20T18:28:07+00:00] INFO: *** Chef 12.7.2 ***
[2016-03-20T18:28:07+00:00] INFO: Chef-client pid: 488
[2016-03-20T18:28:08+00:00] WARN: unable to detect ipaddress
[2016-03-20T18:28:15+00:00] INFO: Run List is []
[2016-03-20T18:28:15+00:00] INFO: Run List expands to []
[2016-03-20T18:28:15+00:00] INFO: Starting Chef Run for nano
[2016-03-20T18:28:15+00:00] INFO: Running start handlers
[2016-03-20T18:28:15+00:00] INFO: Start handlers complete.
[2016-03-20T18:28:16+00:00] INFO: Loading cookbooks []
[2016-03-20T18:28:16+00:00] WARN: Node nano has an empty run list.
[2016-03-20T18:28:16+00:00] INFO: Chef Run complete in 1.671495 seconds
[2016-03-20T18:28:16+00:00] INFO: Running report handlers
[2016-03-20T18:28:16+00:00] INFO: Report handlers complete
[2016-03-20T18:28:16+00:00] INFO: Sending resource update report (run-id: 1fb8ae2a-8455-4b94-b956-99c5a34863ea)
[172.28.128.3]: PS C:\Users\vagrant\Documents>
We can use chef-client -r recipe[windows] if you have the windows cookbook on your server to converge its default recipe.
What else is missing?
The other gaping hole here is Test-Kitchen cannot converge a Nano test instance. Two main reasons prevent this:
- There is no provisioner that can get around the MSI install issue
- Powershell calls from the winrm gem will fail because Nano's Powershell.exe does not accept the -EncodedCommand argument.
One might think that the first issue could probably be worked around by creating a custom provisioner to extract the chef files on the host and copy them to the instance. However, because winrm-fs, used by Test-Kitchen to copy files to a windows test instance, makes ample use of the -EncodedCommand argument. Shawn Neal and I are currently working on a v2 of the winrm gem that will use a more modern protocol for powershell calls to get around the -EncodedCommand limitation and provide many other benefits as well.
Try it out!
Regardless of the missing pieces, as you can see, one can at least play with Chef and Nano today and get a glimpse of what life might be like in the future. Its no flying car but it beats our multi gigabyte Windows images of today.